
After you have been delivered or accepted an email from a Queue, you can simply click on the Reply button, or the Reply All button to open the reply tab in the interaction window.
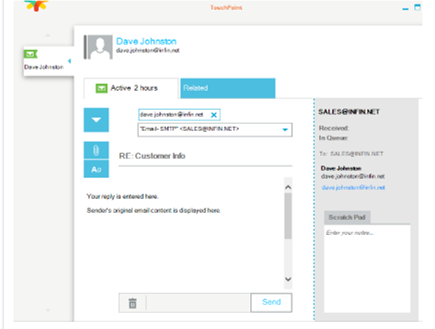
The reply email will be pre-populated with the contact’s email address. You can type in your reply, attach any related files, select a template, and format the text using the appropriate buttons.
Tip Reply Email Address: If you want to change the reply email address, use the drop-down arrow in the reply email address field to select the address you want. The number and type of reply email addresses will depend on your security permissions and the way your system is set up. You will typically have the Queue email address and your email address as default options.
Tip To add an attachment click on the attachment button  . To view the attachment hover over the attachment and click Open.
Tip To paste plain text into the email, for example when pasting the contents of a spreadsheet as plain text rather than in table format, click on the  icon on the formatting toolbar.
Once you are done click Send to complete the process.
Email Template
Select an appropriate template using the Template button.
Your administrator may have set a default template; however, if this is not the template you want, you can click this button and select another one.
After clicking on the template button we will display a template list and preview window. You can search for a specific template or browse through the list of available templates. We will also display a preview of the template so that you can see what it looks like before you select it.